
10-Minute Knee Strengthening Routine: 5 Exercises That Actually Fixed My ACL Recovery
This blog is based on a video from my YouTube channel. If you prefer to watch that, click here.
A year after ACL surgery, I was cleared to do pretty much everything.
My knee had other ideas.
It would ache after long days of standing. It felt unstable during workouts. And the worst part? I just couldn't trust it the way I used to. That loss of confidence in your own body is something nobody warns you about in the ACL recovery timeline.
This 10-minute knee routine is what actually changed that. No equipment required (except a low step for one exercise). Five movements. Two sets each. And to be honest, I still do this a couple times a week -- because it keeps working.
Here's the full routine, the reps and sets for each exercise, and why each movement specifically matters for knee health and stability.
Important: Nothing in this routine should cause sharp pain. If you're dealing with a recent acute injury, active swelling, or are early post-surgery, check with your PT or surgeon before attempting these. This routine is best suited for people who are cleared for exercise but dealing with ongoing instability, weakness, or nagging discomfort.
Why This Routine Works (And Why Most Knee Routines Don't)
Most knee rehab content focuses on stretching. Stretch your quads, stretch your hamstrings, foam roll your IT band. And while mobility matters, stretching alone doesn't fix instability.
This routine works because it strengthens the tissues around the knee through the ranges of motion they actually need. That's a meaningful distinction. You're building strength in the positions where your knee is most vulnerable -- not just improving passive flexibility.
The five movements work together to address:
Tibialis and shin strength (shock absorption and force control)
VMO activation and knee tracking (quad balance and stability)
Deep knee flexion strength (knees-over-toes capacity)
Hip flexor length and mobility (compensations that load the knee)
Hamstring mobility with active control (not just passive stretching)
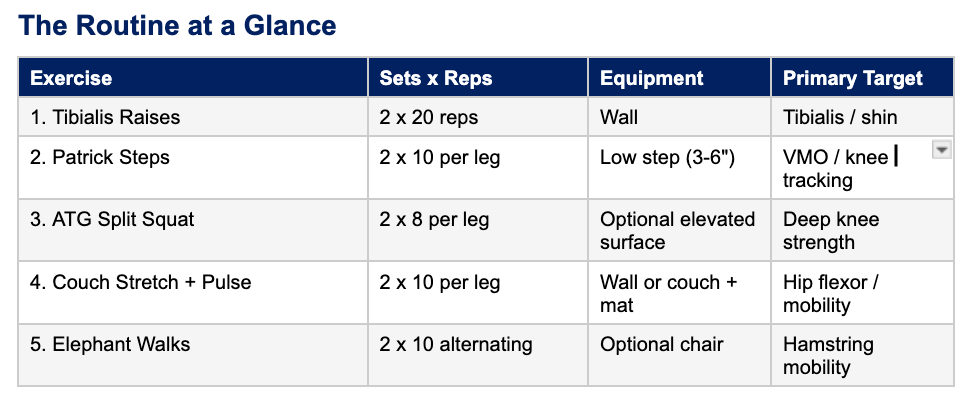
Exercise 1: Tibialis Raises
Sets/Reps: 2 sets of 20 reps
How to Do It
Stand with your back flat against a wall
Walk your feet forward 8-18 inches from the wall (closer = easier, farther = harder)
You should feel slightly reclined -- this is intentional
Keep heels planted on the ground the entire time, legs straight but not locked
Lift your toes up toward your shins as high as possible
Pause briefly at the top
Slowly lower back down -- control the descent, don't drop
Why It Matters
Your tibialis anterior -- the muscle running along the front of your shin -- is chronically undertrained in most people. But it's your knee's first line of defense for impact absorption.
Every time you walk downstairs, land from a jump, or stop suddenly, your tibialis is controlling the force that would otherwise go straight into your knee joint. A weak tibialis means all of that impact lands on the joint itself.
You should feel a burn building in your shins as you approach rep 20. That's exactly the right response.
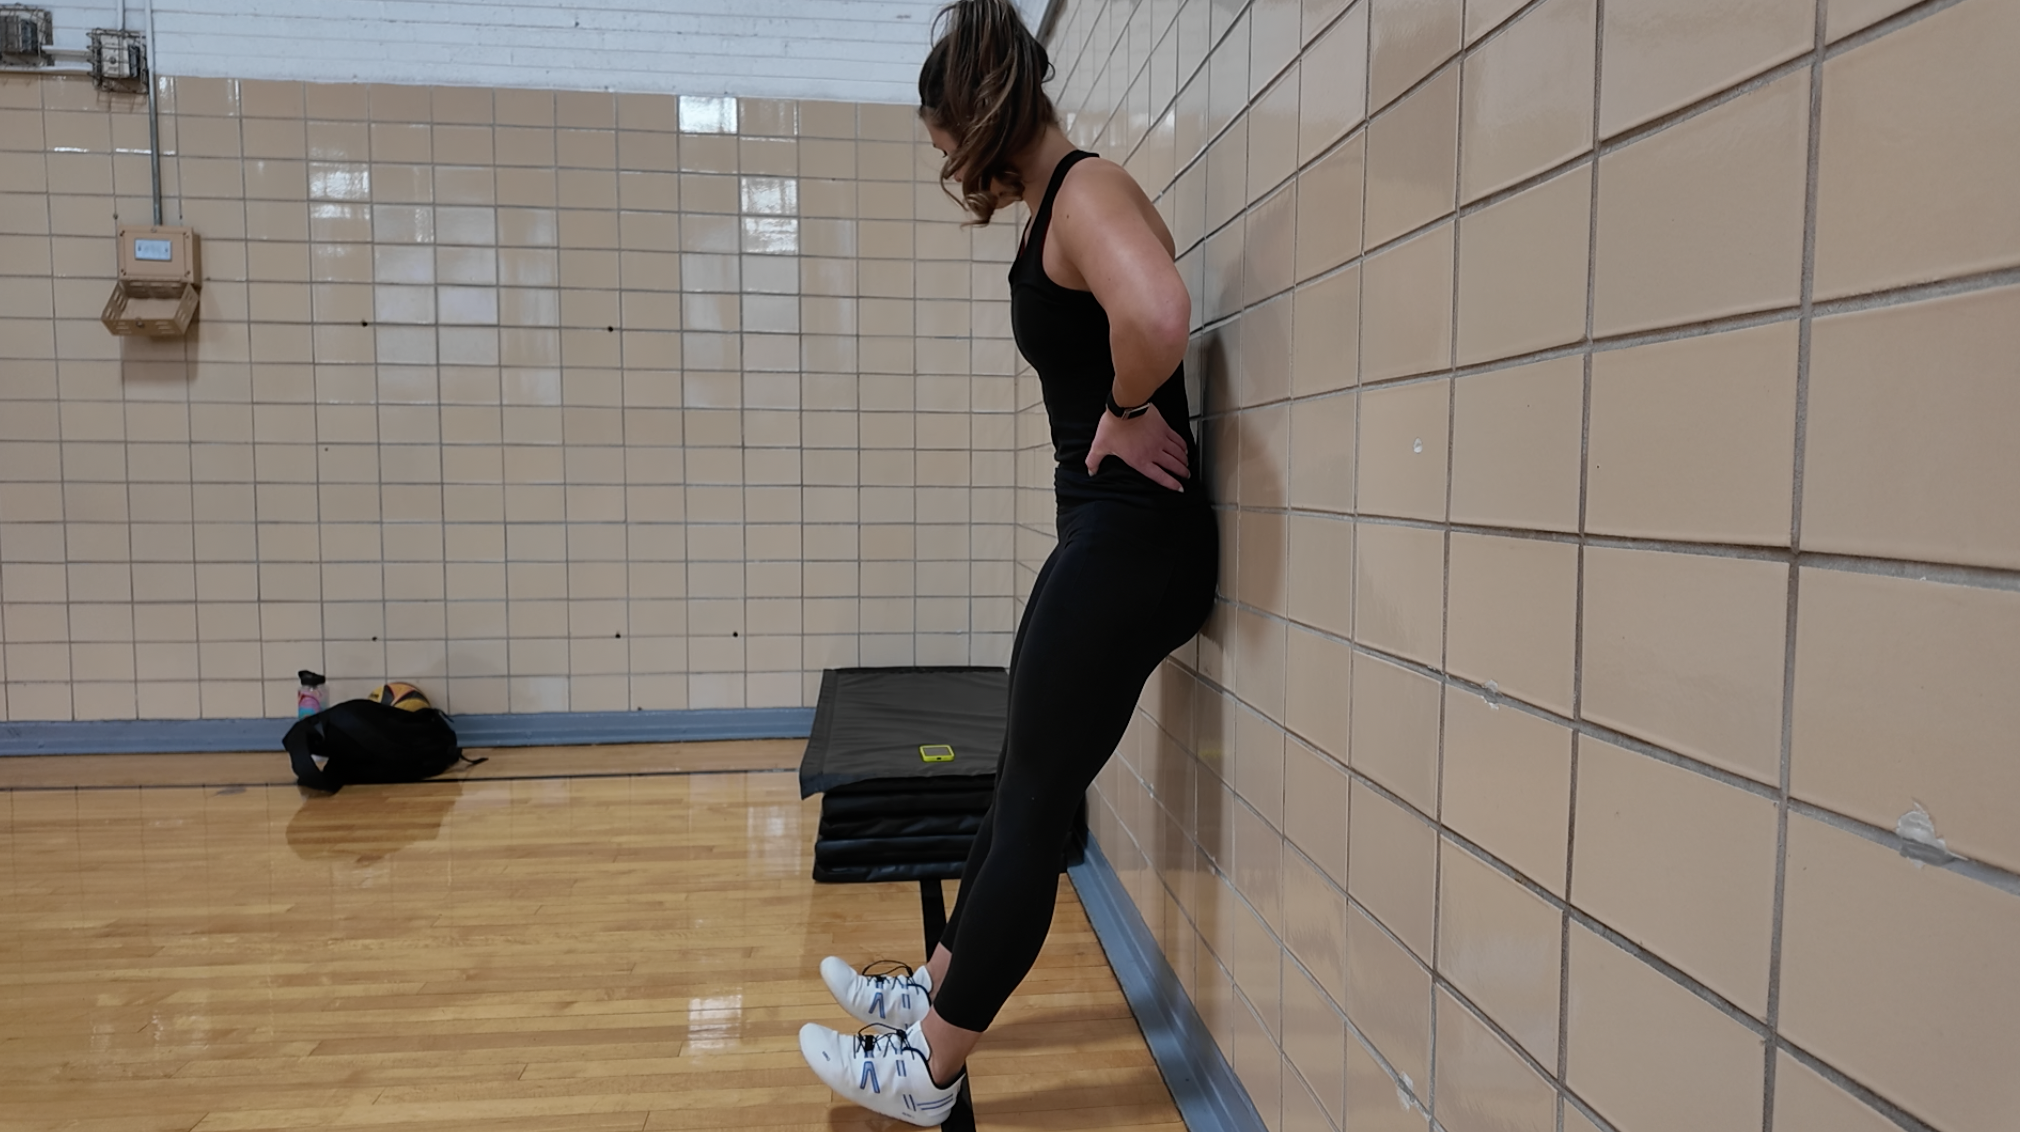
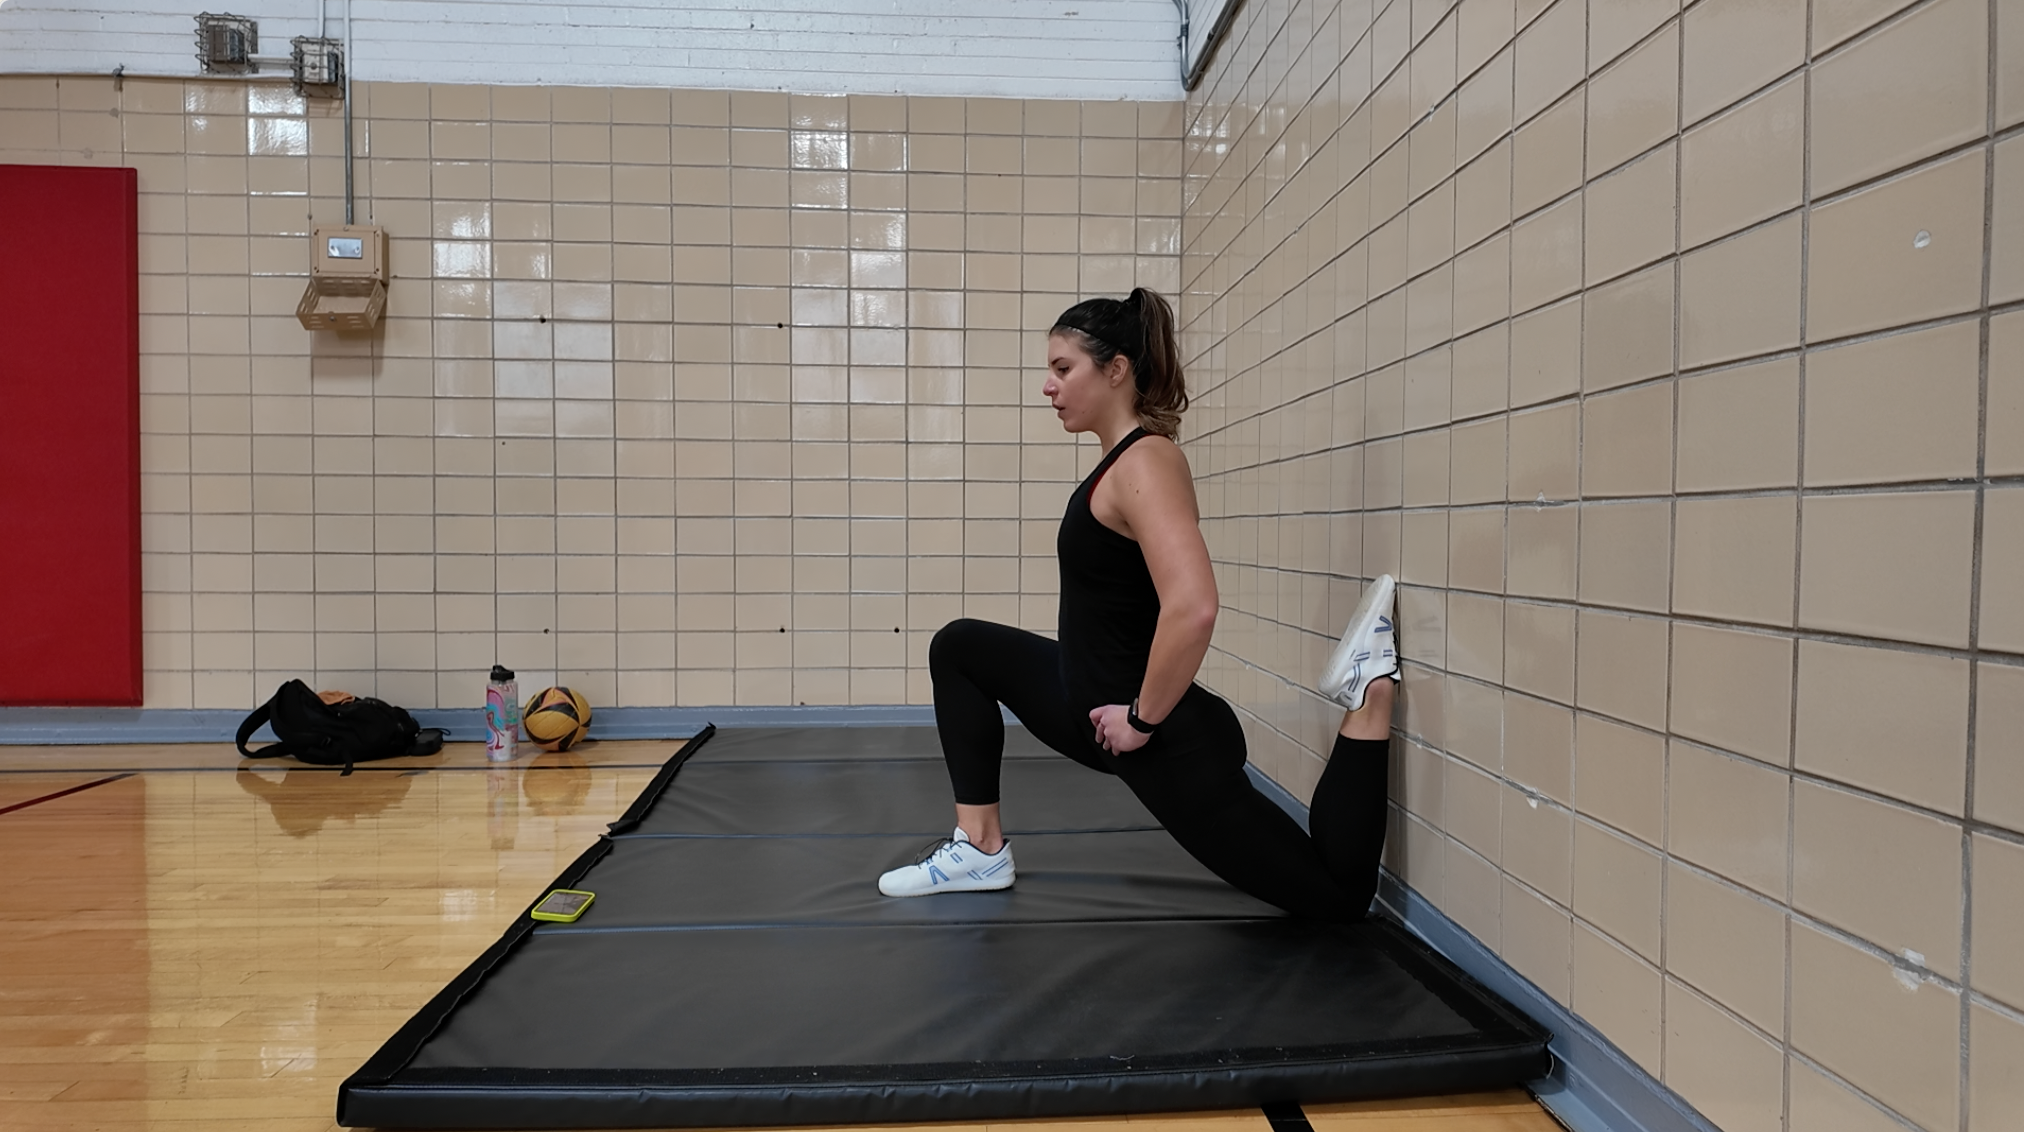
Exercise 2: Patrick Steps
Sets/Reps: 2 sets of 10 reps per leg
Equipment: A low step or platform, 3-6 inches high
How to Do It
Stand completely on top of the step, one foot planted, the other hanging off the front edge
Shift most of your weight into the foot on the step
Slowly bend the knee of your working leg and lower the hanging heel toward the floor
Lightly tap that heel, then return to start
Keep your hips pushed forward -- don't lean back or hinge at the hip
Keep your upper body upright throughout
Watch that your working knee doesn't cave inward or wobble outward
Why It Matters
This exercise targets the VMO -- the teardrop-shaped muscle on the inner quad -- and trains proper knee tracking. The VMO is one of the first muscles to atrophy after an ACL injury or any significant knee trauma, and weakness here directly contributes to the unstable, wobbly feeling that persists well into recovery.
The key cue is keeping hips forward, not back. Leaning back shifts the work to your glute and completely bypasses the point of the exercise.
It's very common for one leg to feel significantly weaker or wobblier than the other. That imbalance is normal -- especially post-injury -- and this exercise is specifically designed to address it.
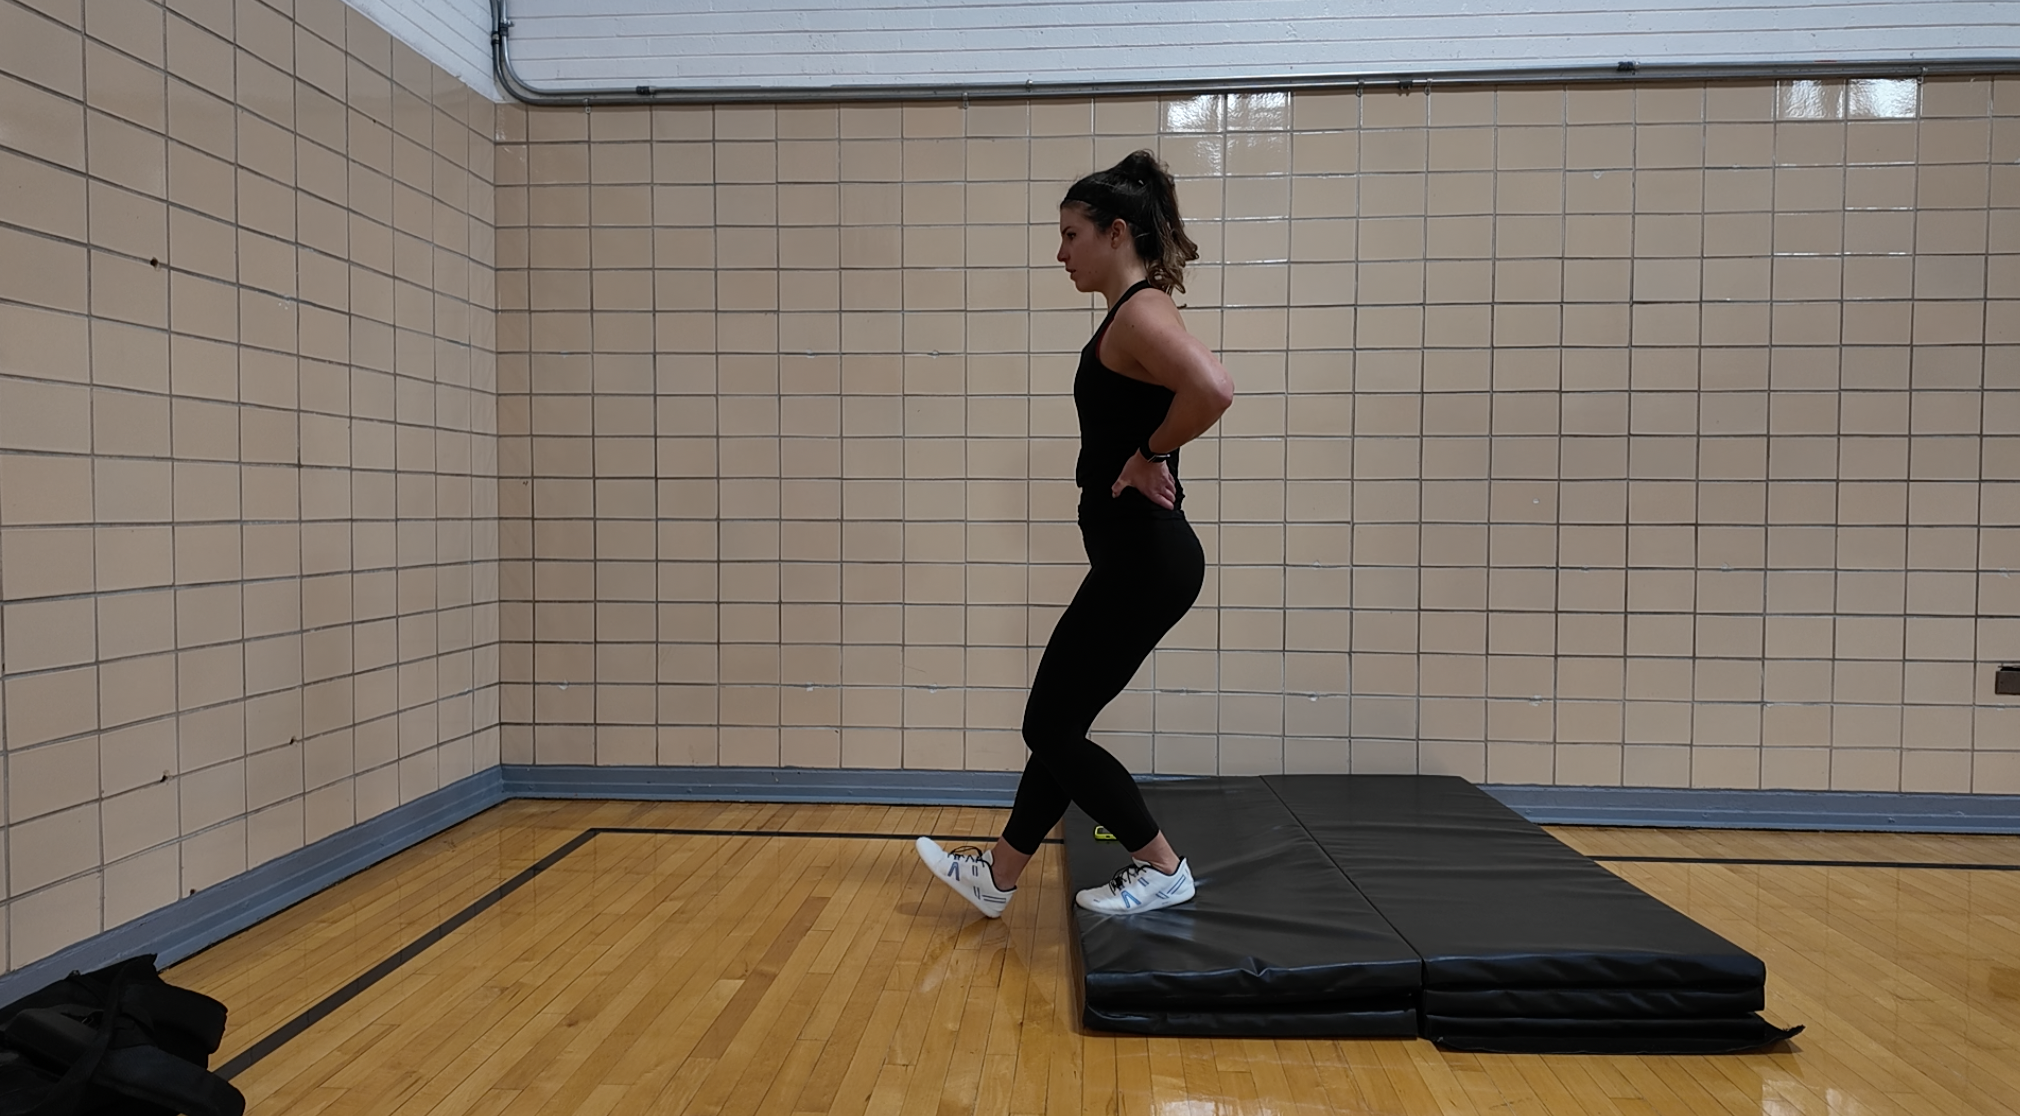
Exercise 3: ATG Split Squat
Sets/Reps: 2 sets of 8 reps per leg
Equipment: Optional elevated surface (bench or chair) for the front foot if needed
How to Do It
Set up in a split stance, feet hip-width apart
Front foot flat on the ground, back foot on ball of foot with heel elevated
Keep the back leg relatively straight throughout -- this is what distinguishes ATG from a regular split squat
Lower down with the straight back leg (tiny micro-bend is fine, but don't drop the knee to the ground)
Let your front knee travel forward over your toes -- this is intentional and correct
Keep chest tall, front heel down as much as possible
If you feel sharp or pinching pain in the knee joint, reduce your depth
Modification
If your hip flexor on the back leg is the main limiting factor, elevating your front foot on a bench or chair takes some of that tension off and lets you work into the movement more gradually.
Why It Matters
ATG stands for "ass to grass" -- this is a deep range of motion movement, and that's the whole point. It builds strength in the deep knee flexion range that most conventional training completely ignores.
The knees-over-toes loading pattern here is based on the work popularized by Ben Patrick (Knees Over Toes Guy) and the ATG training system, which has significant support in rehab and sports performance for rebuilding knee resilience. The idea that your knee should never go over your toes is outdated -- progressive loading through full range of motion is actually how you rebuild durable, healthy knees.
This is the most challenging exercise in the routine. Wobbling and feeling off-balance is normal when you're new to it.
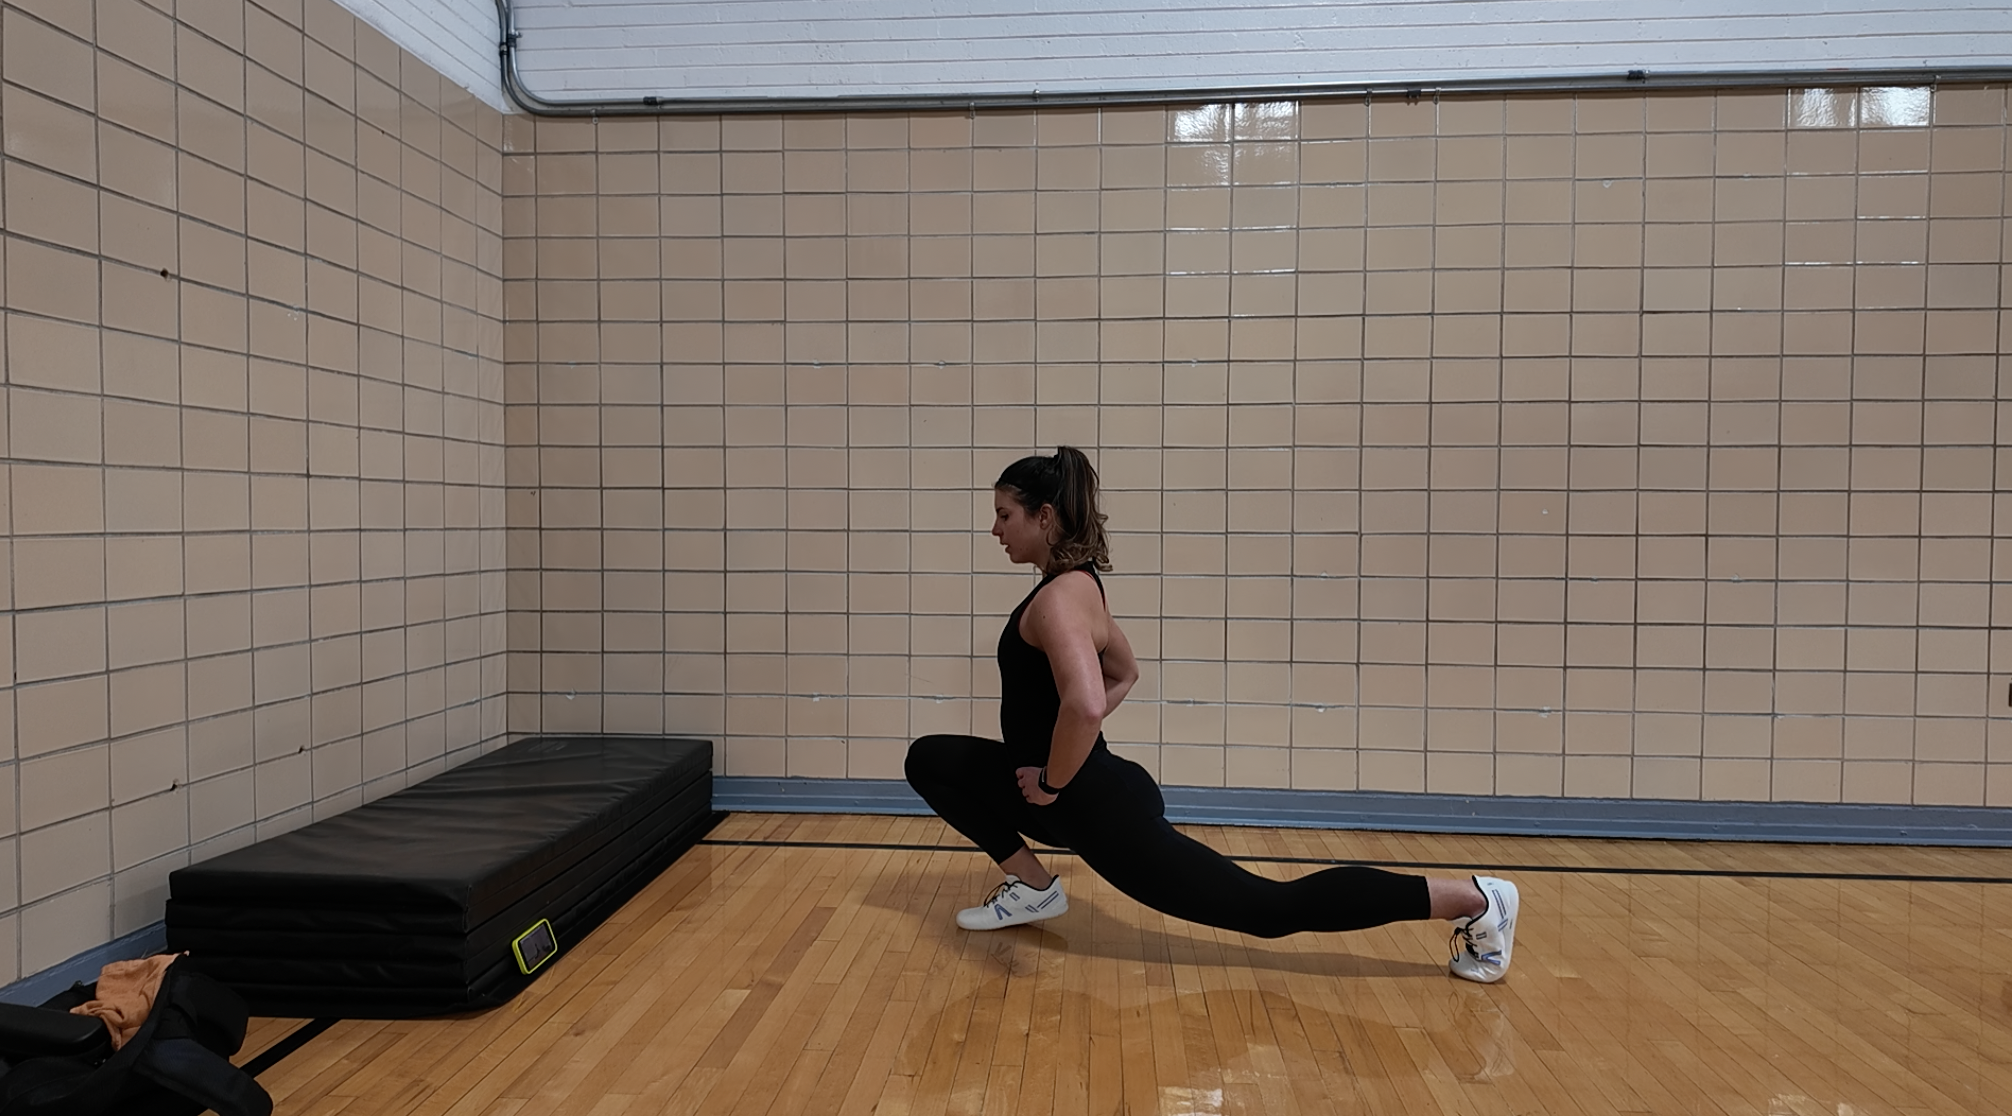
Exercise 4: Couch Stretch with Lunge Pulse
Sets/Reps: 2 sets of 10 pulses per leg
Equipment: Wall or couch + something soft under your knee (mat or folded towel)
How to Do It
Face away from a wall or couch, about 1 to 1.5 feet away from it
Get down on one knee with something cushioned under it
Lift your back foot and place it against the wall or couch
Step your front foot forward into a lunge position, front knee tracking over toes
Slowly bring your torso upright -- you'll feel an intense hip flexor stretch in the back leg
Squeeze the glute on your back leg at the top (this is the key activation cue)
From here, pulse: rock forward into a deeper lunge, then press back to the upright stretch position
10 smooth, controlled pulses per side
Why It Matters
Tight hip flexors are one of the most underappreciated contributors to knee pain. After an injury, surgery, or any extended period of compensating and favoring one side, the hip flexors get chronically shortened. This pulls on the pelvis, alters mechanics, and loads both knees in ways that are easy to miss.
The glute squeeze cue is important: it prevents you from over-extending your lower back and ensures the stretch is actually hitting the hip flexor rather than just grinding through your lumbar spine.
In the second set, aim to get a little more upright in the stretch position and a little deeper in the forward pulse.
Exercise 5: Elephant Walks
Sets/Reps: 2 sets of 10 alternating steps
Equipment: Optional chair or bench in front of you if hamstring flexibility is limited
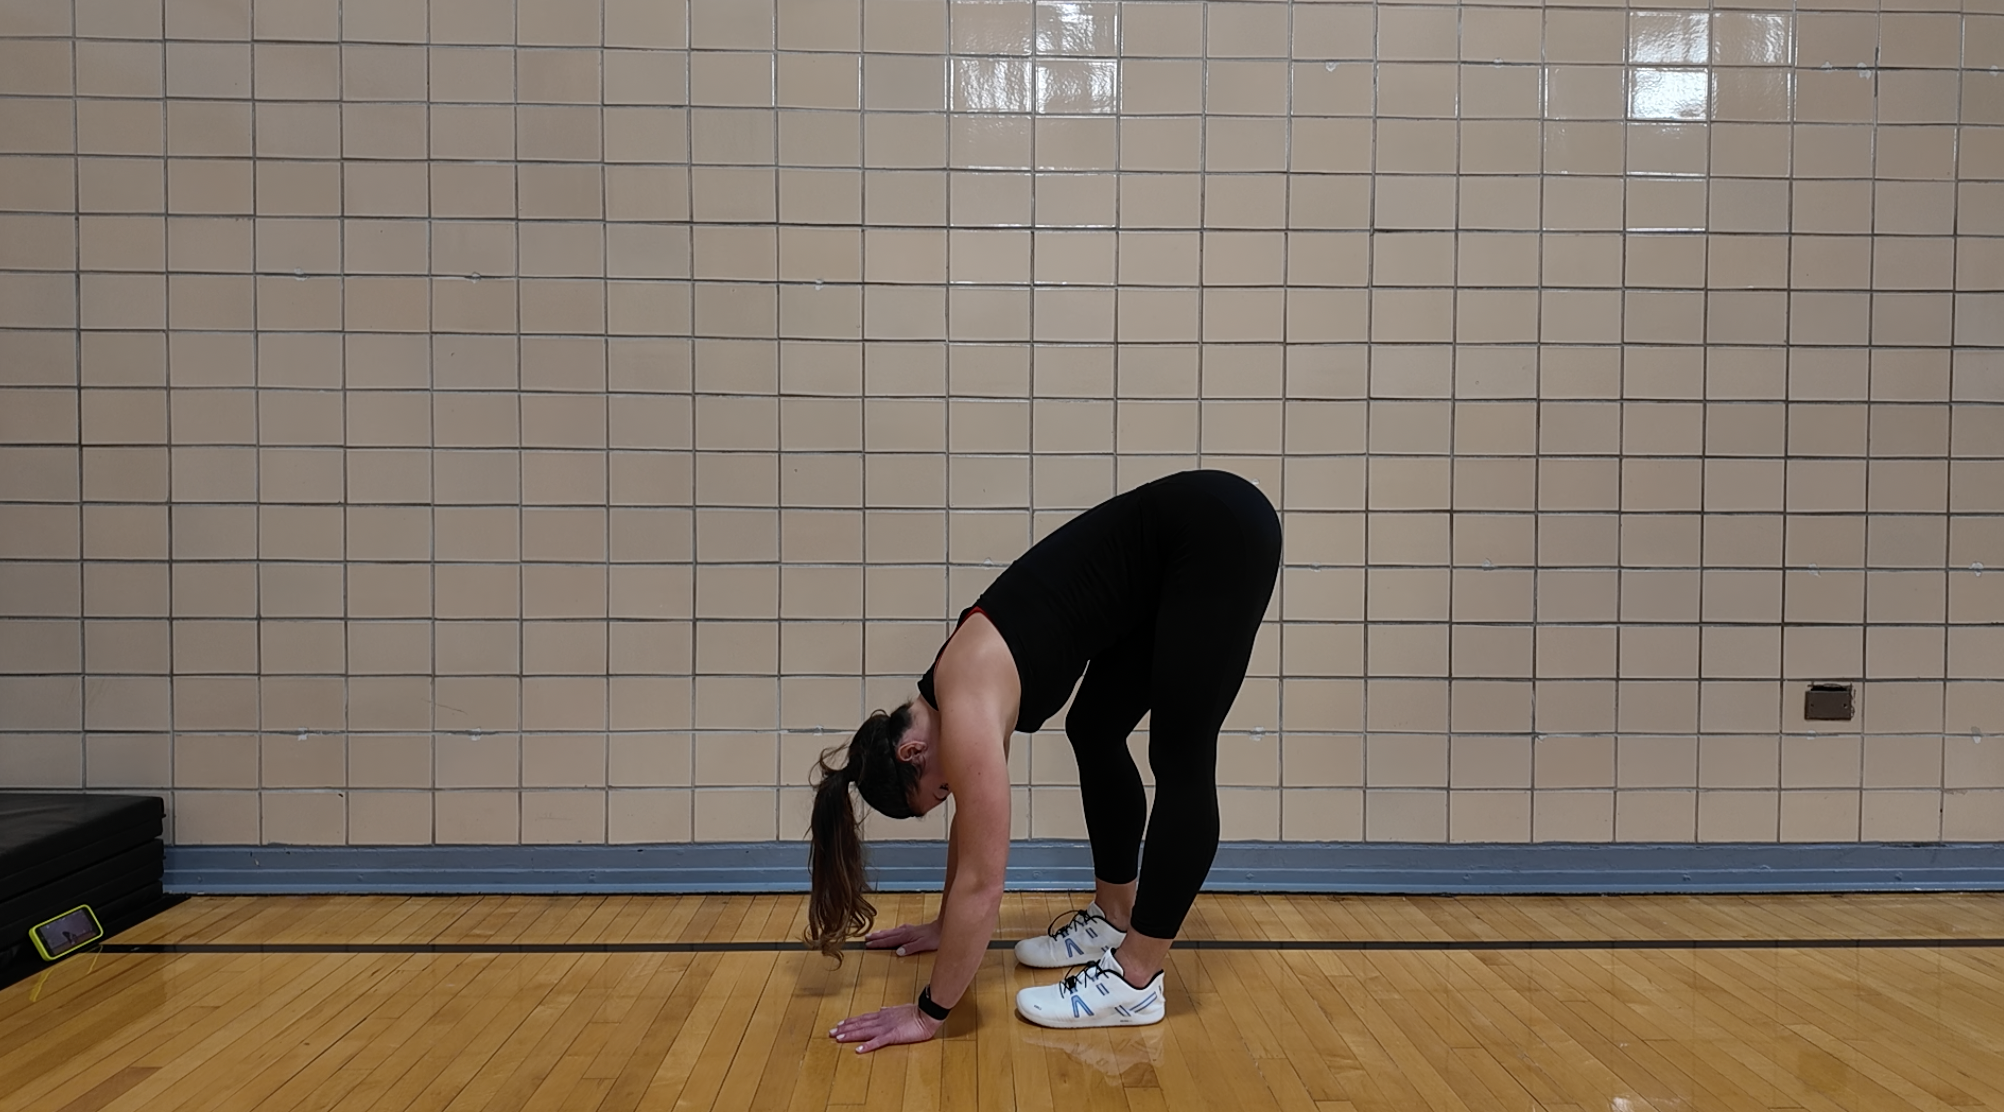
How to Do It
Stand feet hip-width apart with clear space in front of you
Hinge forward and reach your hands toward the ground (or to a chair if needed)
Start with both knees slightly bent
Slowly straighten one leg at a time, keeping hands on the ground (or chair)
Alternate which leg is straight and which is bent
Move slowly and deliberately -- you should feel a deep hamstring stretch on the straightening leg
No bouncing, no jerky movement -- smooth and controlled throughout
Why It Matters
This is active mobility -- you're building hamstring flexibility while maintaining tension and control through the movement. That's a fundamentally different stimulus than passively hanging in a stretch.
Tight hamstrings pull on the back of the knee and affect how force is distributed through the joint. The elephant walk addresses this in a way that translates to real movement patterns rather than just temporarily loosening tissue.
Frequently Asked Questions
How often should I do this routine?
Start with 2-3 times per week. Once you're comfortable with all five movements and they feel less challenging, you can work up to daily. Consistency over time is what creates lasting change.
Can I do this after ACL surgery?
This routine was developed from my own post-ACL experience, but it's not a substitute for your formal rehab protocol. If you're in active recovery, check with your PT before adding these. That said, several of these movements -- particularly tibialis raises and Patrick steps -- are commonly incorporated in late-stage ACL rehab once you're cleared for strengthening.
What if one exercise causes pain?
Sharp or pinching pain in the joint is a signal to stop or modify. Muscle fatigue and burn is expected and fine. If the ATG split squat creates joint pain at depth, reduce your range of motion. If anything consistently causes discomfort beyond muscle work, that's worth flagging with a PT.
Do I need equipment?
For most of the routine, no. The Patrick steps require a low step or platform (3-6 inches -- a thick book or small box works). The couch stretch needs a wall or couch and something soft for your knee. Elephant walks can be modified with a chair if your hamstring flexibility is limited.
The Bottom Line
Ten minutes. Five movements. No equipment needed for most of it.
The reason this routine works where others don't is because it's addressing the actual mechanical demands your knee faces -- strengthening the tibialis for shock absorption, training VMO activation for stability, building knees-over-toes strength in deep ranges, releasing hip flexor tension that loads the joint, and developing active hamstring mobility.
Doing this 2-3 times per week consistently will make a meaningful difference. The movements get easier, the instability starts to resolve, and -- eventually -- you start trusting your knee again.
That last part matters more than people talk about.
Want a personalized protocol that goes beyond this routine and addresses your training, nutrition, and recovery together? Book a free discovery call -- we'll build something specific to your situation and goals.
Disclaimer: This article is for general informational purposes and is not a substitute for professional medical or physical therapy advice. If you are recovering from surgery, have an acute injury, or experience pain during these exercises, consult your healthcare provider or physical therapist before continuing.